Quantcast
Channel: Blog - ServiceNow Elite
Viewing all 191 articles
Browse latest View live

Learn about ServiceNow Scripting

$
0
0

Why use scripting in ServiceNow and how does it work?

If you are new to ServiceNow, or want to know more about scripting, this article may just help you out!

PROGRAMMING STYLES

There are two "styles" of programming in ServiceNow:

Declarative

In computer science, declarative programming is a programming paradigm—a style of building the structure and elements of computer programs—that expresses the logic of a computation without describing its control flow.

In short, declarative is the easy "low-code" or "no code" type of programming.  ServiceNow Express uses all declarative programming.  I believe vendors like Cherwell use declarative primarily as well.

Most of ServiceNow uses declarative programming.  You don't have use scripting, and you shouldn't if you don't have to.

This "layer of abstraction" has been going to replace me since 2000.  

Workflow

Workflow

Declarative Business Rule

Declarative Business Rule

Matching Rule

Matching Rule

Programmatic

When Declarative doesn’t work, meaning you can't get it done with a condition builder or workflow, you can resort to scripting.  The programmatic, technical part of ServiceNow.  Often is just referred to as a generic "scripting".

Most programming in ServiceNow is in Javascript.  However there are branches to other types at times:

  • Javascript - main programming language used in ServiceNow
  • Angular JS - Used in Service Portal and other places
  • JQuery, node.js, and Bootstrap, ECMAScript - Scripting libraries used at times 
  • HTML/CSS - Used throughout ServiceNow and the Service Portal
  • Apache Jelly - Used in UI Pages.  Being replaced by Angular JS.  
  • Groovy (Removed?) - Used in Event Management.  May be replaced now, not sure

In the "Test your skills" section below, that is all about programmatic Javascript.

Script Includes

Script Includes

UI Action

UI Action

Programmatic Business Rule

Programmatic Business Rule

TEST YOUR SCRIPTING SKILLS

Editor's note: sorry if the website strips out some of the code indents and formatting.

1. EXPLAIN THIS SCRIPT

function onChange(control, oldValue, newValue, isLoading) {
   //If the page isn't loading
   if (!isLoading) {
      //If the new value isn't blank
      if(newValue != '') {
         //Type appropriate comment here, and begin script below
            if (newValue == '2'){
               var isItil = g_user.hasRole('itil');
                  if (isItil){
                     g_form.setValue('assigned_to', g_user.userID);
                  }  
            }
      }
   }
}

Answer

This is a Client Script.  On an Incident, if a user sets the state to 2, and the user has the itil role, sets the assigned to field to the logged in user.

2. Explain this script

(function() {
var grIncident = new GlideRecord('incident');
grIncident.addQuery('priority','5');
grIncident.addQuery('category','inquiry');
grIncident.query();
if (grIncident.next()) {
gs.print('Incident Found: '+grIncident.number);
}
})();

Answer

This could be used as Background Script. It uses the GlideRecord library to query for incidents with the priority of 5 and category of "inquiry".  If the query finds incident, it will print the Incident number to the console.  The if statement will limit that to 1 printed.

[0:00:00.028] Script completed in scope global: script
*** Script: Incident Found: INC0000020

3. EXPLAIN THIS SCRIPT

(function() {
var grIncident = new GlideRecord('incident');
grIncident.addQuery('priority','5');
grIncident.addQuery('category','inquiry');
grIncident.setLimit(1);
grIncident.query();
if (grIncident.next()) {
gs.print('Incident Found: '+grIncident.number);
}
})();

Answer

This could be used as Background Script. This is the same as the script in #2.  However there is a setLimit statement to limit returned values from the query to 1.  

[0:00:00.028] Script completed in scope global: script
*** Script: Incident Found: INC0000020

3. EXPLAIN THIS SCRIPT

(function() { 
var grIncident = new GlideRecord('incident');
grIncident.addEncodedQuery('priority=5^category=inquiry');
grIncident.setLimit(1); 
grIncident.query(); 
if (grIncident.next()) {
gs.print('Incident Found: '+grIncident.number);
}
})();

Answer

This could be used as Background Script. This is the same as the other scripts above, except it uses an encoded query.  Encoded queries are a similar way to write query statements, but not always applicable in all situations.

[0:00:00.028] Script completed in scope global: script
*** Script: Incident Found: INC0000020

4. EXPLAIN THIS SCRIPT

(function() { 
var grIncident = new GlideRecord('incident');
grIncident.addEncodedQuery('priority=5^category=inquiry'); 
grIncident.query(); 
while (grIncident.next()) {
gs.print('Incident Found: '+grIncident.number);
}
})();

Answer

This could be used as Background Script. This is like all the scripts above, except uses a while statement to return multiple values.

[0:00:00.008] Script completed in scope global: script
*** Script: Incident Found: INC0000020
*** Script: Incident Found: INC0000021
*** Script: Incident Found: INC0000024
*** Script: Incident Found: INC0000028
*** Script: Incident Found: INC0000029
*** Script: Incident Found: INC0000032
*** Script: Incident Found: INC0000035
*** Script: Incident Found: INC0000036

5. EXPLAIN THIS SCRIPT

(function() {
 var grIncident = new GlideRecord('incident');
 grIncident.get('priority','5');
 gs.print('Incident Found: '+grIncident.number);
})();

Answer

This could be used as Background Script. This script uses a get method to return a value.  

6. WHAT IS WRONG WITH THIS SCRIPT?

(function() {
  var count = new GlideAggregate('cmdb_ci');
  count.addAggregate('COUNT', 'sys_class_name');
  count.query();
  var ciClass = count.sys_class_name;
  var classCount = count.getAggregate('COUNT', 'sys_class_name');
  gs.log("The are currently " + classCount + " configuration items with a class of " + ciClass);
})();

Answer

Missing while (count.next()) { statement. 

7. EXPLAIN THIS SCRIPT

Solution Proposed Info Message
Table: Incident
When: display
Condition: current.incident_state == 6 && (gs.hasRole("itil_admin") || gs.hasRole("admin") || gs.getUserID() == current.caller_id
Script:
function onDisplay(current, g_scratchpad) {
gs.addInfoMessage('This incident has a Proposed Solution.Click Accept Solution to accept this solution, or Reject Solution to reject this solution.This Incident will close automatically in 2 business days if no action is taken.');
}

Answer

Business Rule. This script adds an information message to the form to Accept a Solution.  

8. EXPLAIN THIS SCRIPT

Name: Related cases
Applies to table: <case>
Queries to table: <case>
Query with:
var qc = current.addQuery("parent", parent.sys_id);
qc.addOrCondition("sys_id", parent.parent);

Answer

Relationship.  Adds M2M relationship between cases.

9. What is wrong with this script?

var grIncident = new GlideRecord('incident'); grIncident.addQuery('short_description', ''); 
while (grIncident.next()) {
grIncident.short_description = "Priority "+ grIncident.priority + " Caller: "+ grIncident.caller_id.name; 
grIncident.autoSysFields(false); 
grIncident.setWorkflow(false); 
grIncident.update();
}

Answer

Missing the grIncident.query(); line.  Without that, nothing will happen.  

9. EXPLAIN THIS SCRIPT

doit("incident");
doit("sc_request");
doit("sc_req_item");
doit("sc_task");
doit("problem");
doit("problem_task");
doit("change_request");
doit("change_task");
doit("wf_context");
doit("sys_email");
doit("task_ci"); doit("sysapproval_approver");
doit("sysapproval_group");
function doit(table) {
var gr = new GlideRecord(table);
gr.query();
while (gr.next()) {
gr.deleteRecord();
}
}

ANSWER

Background script. This was a common script back in the day. Questionable usage of the "doit" function name. Deletes all records from table specified.

10. EXPLAIN THIS SCRIPT

Table: Incident [Incident]
Active: true
When: after
Insert: true
Update: true
Order: 100
Condition: current.isValidRecord() && (!current.cmdb_ci.nil() && previous.cmdb_ci.nil()) || (current.cmdb_ci != previous.cmdb_ci)
Script:
(function executeRule(current, previous /*null when async*/) {
   var ciOutage = new GlideRecord('cmdb_ci_outage');
   ciOutage.initialize();
   ciOutage.begin = current.opened_at;
   ciOutage.end = current.closed_at;
   ciOutage.cmdb_ci = current.cmdb_ci;
   ciOutage.u_related_incident = current.sys_id;
   ciOutage.type = "Outage";
   ciOutage.insert();
})(current, previous);

ANSWER

Business Rule.  Creates an outage record from an incident when CI added to Incident.

11. EXPLAIN THIS SCRIPT

(function() {
var gr = new GlideRecord('sys_user');
gr.addQuery('roles','!=','admin');
gr.query();
while (gr.next()) {
gr.locked_out= true;
gr.update();
}
})();

ANSWER

This could be used as Background script. Creates an outage record from an incident when CI added to Incident.

11. EXPLAIN THIS SCRIPT

Type: onChange
Field: u_awesome_check
Script:
function onChange(control, oldValue, newValue, isLoading) {
if (isLoading || newValue == '') {
return;
}
if (newValue == 'mike_awesome') {
alert('Yes this is true'); }
}

ANSWER

Client Script. If u_awesome_check equals mike_awesome, it sends an alert to the user

12. EXPLAIN THIS SCRIPT

Name: Assignment Group Check
When: before
Insert/Update: true
Table: Incident [incident]
Condition: current.assigned_to.changes() && !current.assignment_group.nil() && !gs.hasRole('admin') && !current.assigned_to.nil()
Script:
(function() {
  if (!gs.getUser().isMemberOf(current.assignment_group)) {
    current.assignment_group = previous.assignment_group;
    current.assigned_to = previous.assigned_to;
    //current.setAbortAction(true);
    gs.addErrorMessage('Can not set assigned to unless you are a member of that Assignment group ');
  }
})();

ANSWER

Business Rule.  Doesn't allow setting assigned to unless member of that group.  I tried this business rule, I didn't like it, but it is kind of interesting.

13. EXPLAIN THIS SCRIPT

When: before
Insert/Update: true
Table: Incident [incident]
Condition: current.state.changesTo(6) && current.priority == 1
Script:
if (current.reopen_count == 0) {
var prob = new GlideRecord('problem');
prob.initialize();
prob.u_requested_by = current.caller_id;
prob.u_phone = current.u_phone;
prob.short_description = current.short_description;
prob.description = current.description;
prob.company = current.company;
prob.location = current.location;
prob.approval = 'Approved';
prob.state = 5;
var sysID = prob.insert();
current.problem_id = sysID;
current.work_notes = ("Problem " + prob.number + " created");
gs.addInfoMessage("Problem " + prob.number + " created");
}
current.update();

ANSWER

Business Rule.  Runs when state changes to resolved, priority is 1. Creates a Problem record if this is a Priority incident and user has problem role

14. EXPLAIN THIS SCRIPT

Form Context Menu: true
Condition: gs.hasRole("itil")
Script:
createStory();
function createStory() {
var grStory = new GlideRecord("rm_story");
grStory.initialize();
grStory.short_description = current.short_description;
grStory.u_requestor = current.caller_id;
grStory.comments = current.comments.getJournalEntry(1);
grStory.work_notes = "Generated from Incident " + current.number;
var sysID = grStory.insert();
GlideSysAttachment.copy('rm_story', current.sys_id, 'grStory', sysID);
gs.addInfoMessage(gs.getMessage("Story {0} converted from Incident {1}", [grStory.number, current.number]));
gs.addInfoMessage("Story " + grStory.number + " created");
action.setRedirectURL(grStory);
action.setReturnURL(current);

current.close_code = 'Moved to Story';
current.close_notes = "Moved to Story "+grStory.number;
current.state = 7;
current.active = 'false';
current.update();
}

ANSWER

UI Action.  Converts an Incident into a story

15. EXPLAIN THIS SCRIPT

Table: Change Task [change_task]
When: display
insert: true
Advanced: true
Condition: current.isNewRecord() && !current.change_request.nil()
cript:
(function executeRule(current, previous /*null when async*/) {
current.cmdb_ci = current.change_request.cmdb_ci;
current.due_date = current.change_request.due_date;
})(current, previous);

ANSWER

Business Rule.  When you create a change task, it takes the CI and Due Date from the related Change Request.

16. What DOES this TRANSFORM SCRIPT DO?

if (action == 'insert') {
ignore = true;
}

ANSWER

Transform "Run Script".  Ignores inserts and only updates records.

17. EXPLAIN THIS SCRIPT

Copy Contract
Table: Contract
Order: 100
Form Context Menu: true
Form link: true
Active: true
Show insert: true
Show update: true
Script:
copyContract();
function copyContract() {
var grContract = new GlideRecord("ast_contract");
grContract.initialize();
grContract.vendor = current.vendor;
grContract.contract_model = current.contract_model;
grContract.location = current.location;
grContract.u_product = current.u_product;
grContract.u_client = current.u_client;
grContract.cost_center = current.cost_center;
grContract.po_number = current.po_number;
grContract.u_purchase_request = current.u_purchase_request;
grContract.short_description = current.short_description;
grContract.description = current.description;
grContract.approver = current.approver;
grContract.contract_administrator = current.contract_administrator;
grContract.vendor_contact = current.vendor_contact;
grContract.starts = current.starts;
grContract.ends = current.ends;
grContract.payment_amount = current.payment_amount;
var sysid = grContract.insert();

action.setRedirectURL(grContract);
action.setReturnURL(current);
}

ANSWER

UI Action. Copies and creates a new contract.

18. EXPLAIN THIS WORKFLOW SCRIPT

answer = checkIfSame();
function checkIfSame(){
 if (current.variables.u_requested_for.manager == current.opened_by){
 return 'yes';
 }
 return 'no';
}

ANSWER

Checks if manager is same as opened by in a IF Activity in a workflow

19. EXPLAIN THIS SCRIPT

<?xml version="1.0" encoding="utf-8" ?>
<j:jelly trim="false" xmlns:j="jelly:core" xmlns:g="glide" xmlns:j2="null" xmlns:g2="null">
<g:evaluate var="jvar_guid" expression="gs.generateGUID(this);" />
<j:set var="jvar_n" value="show_incidents_${jvar_guid}:${ref}"/>
<g:reference_decoration id="${jvar_n}" field="${ref}" 
onclick="showRelatedList('${ref}'); "
title="${gs.getMessage('Show related incidents')}" image="images/icons/tasks.gifx"/>

<script>
// show related list 
// todo: should be part of the PopupWindow class
// todo: needs new stack name
function showRelatedList(reference) {
var s = reference.split('.');
// Get the field name which is always last
var referenceField = s[s.length - 1];
var v = g_form.getValue(reference);
var w = new GlideDialogWindow('show_list');
w.setTitle('Related incidents');
w.setPreference('table', 'incident_list');
w.setPreference('sysparm_view', 'default');
w.setPreference('sysparm_query', referenceField + '=' + v);
w.render();
}

</script>
</j:jelly> 

ANSWER

UI Macro.  Adds button next field to show related incidents

20. EXPLAIN THIS SCRIPT

gs.print(getDuplicates('cmdb_ci_server','ip_address'));
function getDuplicates(tablename,val) {
 var dupRecords = [];
 var gaDupCheck = new GlideAggregate(tablename);
 gaDupCheck.addQuery('active','true');
 gaDupCheck.addAggregate('COUNT',val);
 gaDupCheck.addNotNullQuery(val);
 gaDupCheck.groupBy(val);
 gaDupCheck.addHaving('COUNT', '>', 1);
 gaDupCheck.query();
 while (gaDupCheck.next()) {
 dupRecords.push(gaDupCheck[val].toString());
 }
 return dupRecords;
}

ANSWER

This could be used as Background Script. This script finds all duplicate servers by IP Address.  It uses the GlideAggregate library to find them.  GlideAggregate is faster than GlideRecord for these types of queries.

MORE RESOURCES

Helpful sites to help with scripting:


Shared Services

$
0
0

Shared services is the consolidation of business operations that are used by multiple parts of the same organization.  

Shared services are cost-efficient because they centralize back-office operations that are used by multiple divisions of the same company and eliminate redundancy. Some companies use a chargeback system to bill divisions that use the service on a per-use, per-quarter or per-year basis.  Other companies absorb the cost of shared services as part of the continuing cost of running the business. Today, most companies employ a shared services model for finance, human resources management (HRM) and information technology (IT).

Benefits OF SHARED SERVICES

  • Economic - Higher productivity by consumer-like service portal and automated request fulfillment processes give employees more time for core business functions. Significantly reduce service delivery costs by driving standardization, consistency, and consolidation.
  • Strategic - Achieve process and system standardization and meet increased demand with fewer full time employees. 
  • Quality - Improved information by using a common platform provides you with complete visibility into service usage, costs, errors, and bottlenecks. Develop service delivery best practices and establish centers of excellence. 
  • Speed - Automate and orchestrate interactions across departments to rapidly fulfill service requests.

POWER OF THE PLATFORM

Why is ServiceNow an ideal foundation for a shared services implementation?  It is a single platform that can do so much and is designed with service management and consolidation in mind.

One Platform

Customer Service, IT, HR, and other departments can all use the same platform, sharing functionality and reusing customizations between departments.  No integrations needed, you can easily connect different ServiceNow applications together within the platform.

One Knowledge Base

All your knowledge in one central location filtered for visibility with user criteria.  No need to look in multiple sharepoint sites, sifting through word documents trying to find an answer.  Have one central location for all your company and customer facing information.

One Service Portal

Your employees, partners, and customers gain easy access to all the consumer‑like business services you can now deliver through one portal.  Provide your stakeholders with an easy way to submit, track, and be proactively alerted to the status of their requests for service. 

One Code Base

Only primarily JavaScript code base to support.  Most of that is declarative as well. You don't have be a coding wizard with a photographic memory to be good at ServiceNow. It is relatively easy compared to other systems.

Rapidly deliver cost‑effective and intuitive services to help your organization become a strategic business partner

Workflow and Ownership

Create services that streamline and automate interactions between departments.  Task Assignments show who owns tasks and are not lost in emails and conversations.

Reporting and SLAs

Create a performance driven culture through measurement and feedback between departments. Manage service delivery through clear service level agreements and responsibilities.

Shared Services need a Platform

If you are going to merge processes, responsibilities, or departments you need a platform to manage it all.  Using different applications deters people from that kind of initiative.   I am biased of course, but I do truly believe ServiceNow is the best platform to start on that journey.

Service Portal: Require attachments

$
0
0

How can you require attachments on a catalog item in the Service Portal (SP)?

Unfortunately you can't just use the Client Script you used in the old CMS site right? The old DOM manipulation scripts used in CMS often won't work in the SP. as it is a different architecture than CMS.

How to require attachments in SP

1. Add a UI Script

  1. In the Left Navigator Bar, go to System UI > UI Scripts
  2. Click New

UI Script: GlobalCatalogItemFunctions

Global: true
Script:
function getSCAttachmentCount() {
  var length;
  try {
  length = angular.element("#sc_cat_item").scope().attachments.length;
  } catch(e) {
  length = -1;
  }
  return length;
}

2. Add a JS Theme

pastedImage_2.png
  1. In the Left Navigator Bar, go to Service Portal > Portals
  2. Click the Portal you want to adjust.  It maybe be the one with URL suffix of "sp".
  3. Click the "info" button for the Theme.  The standard theme is "Stock"
  4. Add your JS Include there
Create New JS Theme
Display Name: GlobalCatalogItemFunctions
UI Script: GlobalCatalogItemFunctions

3. Create a Catalog Client Script

For your catalog item you want to require attachments, use this client script.

function onSubmit() {
  //Works in non-portal ui
  try {
  var attachments = document.getElementById('header_attachment_list_label');
  if (attachments.style.visibility == 'hidden' || attachments.style.display == 'none' ) {
  alert('You must attach the completed form before submitting this request.');
  return false;
  }
  }
  //For Service Portal
  catch(e) {
  var count = getSCAttachmentCount();
  if(count <= 0) {
  alert('You must attach the completed form before submitting this request.');
  return false;
  }
  }
}

Find Distinct Field Counts

$
0
0

Here is a background script you can use to find distinct field counts.

Background script

getDistinct('cmdb_ci_server','os'); //Substitute the table and field values here
function getDistinct(table,field) {
var gaServer = new GlideAggregate(table); 
gaServer.addAggregate('count');
gaServer.orderByAggregate('count'); 
gaServer.groupBy(field);
gaServer.query();
gs.print('Table: '+ table);
while(gaServer.next()){
var myCount = gaServer.getAggregate('count');
gs.print('Distinct field ('+ field + '): ' + gaServer.os + ': ' + myCount);
}
}

Results

*** Script: Table: cmdb_ci_server
*** Script: Distinct field (os): : 11
*** Script: Distinct field (os): Linux Red Hat: 9
*** Script: Distinct field (os): Windows 2003 Standard: 8
*** Script: Distinct field (os): Windows XP: 7
*** Script: Distinct field (os): AIX: 5
*** Script: Distinct field (os): Solaris: 5
*** Script: Distinct field (os): Windows 2000 Server: 2
*** Script: Distinct field (os): HP/UX: 1
*** Script: Distinct field (os): OS/400: 1
*** Script: Distinct field (os): Windows 2000: 1

Configuration Items without Business Service

$
0
0

Here is a report you can build to find Configuration Items without Business Services associated.

Script Include

Name: getCIWithoutBusinessService
Table: Global [global]
Client Callable: true
Script:
// Return an array of sys_ids of CIs without Business service
function getCIWithoutBusinessService(table) {
var configItems = [];
var grCI = new GlideRecord(table);
grCI.addActiveQuery();
grCI.addQuery('grCI.sys_class_name','=',table);
grCI.addQuery('grCI.sys_class_name','!=','cmdb_ci_service');
grCI.query();
while (grCI.next()) {
var configItem = grCI.name.toString();
var grCIRel = new GlideRecord('cmdb_rel_ci');
grCIRel.addActiveQuery();
grCIRel.addQuery('parent.sys_class_name','=','cmdb_ci_service');
grCIRel.addQuery('child','=',grCI.sys_id);
grCIRel.addQuery('child.sys_class_name','!=','cmdb_ci_service');
grCIRel.query();
if (grCIRel.getRowCount() > 1) {
configItems.push(configItem);
}
}
//gs.print(configItems);
return configItems;
}

Report Example 1

Report Title: Configuration Item without Business Service
Table: Configuration Item
Type: List
Filter: Name is one of javascript: getCIWithoutBusinessService('cmdb_ci')

Capture1.PNG

Report Example 2

Report Title: Application without Business Service
Table: Application
Type: List
Filter: Name is one of javascript: getCIWithoutBusinessService('cmdb_ci_appl')

Service Portal: Resolve Incident Button

$
0
0

How to add a "Resolve Incident" button and modal popup for Service Portal (SP).

Eventually I would guess that buttons in SP would be enabled in a later ServiceNow version.  This helps until that is released.

Please note that there are more than one way to do this, but might help you make new buttons of your own.  

Thanks to Nathan Firth for the SP ideas!

Results

Here is what the final result looks like:

Resolve Button

Resolve Button

Modal Popup

Modal Popup

INSTRUCTIONS

1. Create Widget

Name: Resolve Incident

Body HTML Template

<div class="panel b" ng-if="data.showWidget">
 <div class="panel-heading bg-primary">Actions</div>
 <div class="panel-body">
 <button type="button" class="btn btn-success btn-block" ng-click="c.openModalResolve()" ng-if="data.showResolve">Resolve</button>
 <div ng-if="data.response1" class="alert alert-info">{{::data.response1}}</div>
 </div>
</div>

<script type="text/ng-template" id="modalTemplateResolve">
<div class="panel panel-default">
<div class="panel-heading">
<h4 class="panel-title">Provide a reason for the resolve</h4>
</div>
<div class="panel-body wrapper-xl">
<form name="modalTemplateResolve" ng-submit="c.uiAction('resolve')">
<div class="form-group">
<textarea required sp-autosize="true" ng-required="true" ng-model="data.resolveComments" id="resolveComments" placeholder="Comments required" class="form-control ng-pristine ng-valid ng-scope ng-empty ng-touched" aria-invalid="false" style="overflow: hidden; word-wrap: break-word; resize: horizontal;"></textarea>
</div>
<input class="btn btn-primary" type="submit" />
</form>
</div>
</div>
</script>

Server Script

(function() {

// Get table & sys_id
data.table = input.table || $sp.getParameter("table");
data.sys_id = input.sys_id || $sp.getParameter("sys_id");

// Valid GlideRecord
gr = new GlideRecord(data.table);
if (!gr.isValid())
return;

// Valid sys_id
if (!gr.get(data.sys_id))
return;

//Button Visibility
if(data.table == 'incident' && gr.active == true && gr.incident_state != 6 && gr.caller_id == gs.getUserID()){
data.showWidget = true;
data.showResolve = true;

} else {
data.showWidget = false;
data.showResolve = false;
}

//input
if (input && input.action) {
var action = input.action;

// If Incident table
if (data.table == 'incident') {
if (action == 'resolve') {
gr.setValue('incident_state', 6);
gr.setValue('state', 6);
gr.setValue('resolved_by', gs.getUserID());
gr.setValue('close_notes',"Closed by caller with comment: "+ input.resolveComments);
gr.update();
//data.response1 = gs.getMessage('Incident '+gr.number+' was resolved');
}
}
}
})();

Client Script

function($uibModal, $scope, spUtil) {
var c = this;

$scope.$on('record.updated', function(name, data) {
spUtil.update($scope);
}) 

c.uiAction = function(action) {
c.data.action = action;
c.server.update().then(function() {
c.data.action = undefined;
})
c.modalInstance.close();
}
c.openModalResolve = function() {
c.modalInstance = $uibModal.open({
templateUrl: 'modalTemplateResolve',
scope: $scope
});
}
c.closeModal = function() {
c.modalInstance.close();
}
}

2. Drop Widget on Form

  1. Go to the Ticket Page in SP,  go look at an existing incident.
  2. Ctrl-Right click and select "Page in Designer
  3. On the Widgets Sidebar drag-n-drop the "Resolve Incident" widget on the form.
CTRL-Right click Options

CTRL-Right click Options

Page Designer

Page Designer

IP Range Based Authentication

$
0
0

Using IP range based authentication, you can control access by IP address and block access to a specific address or range of addresses that you suspect belong to malicious individuals

More detail from the ServiceNow Documentation

Often companies use IP Range Based Authentication to restrict access to ServiceNow to only within their internal network. Although this is a powerful security restriction, it does limit the functionality of ServiceNow. Mobile usage and remote usage won’t be possible unless users login into your network via VPN.

IP Range Based Authentication or “IP Address Access Control” is installed by default on new ServiceNow instances using New York.

This article documents a process to setup IP Range based authentication to your ServiceNow instance.

STEP 1: GATHER Allowed IP ranges

Gather a list of ip addresses to allow on your ServiceNow instance. By default IP Address Access Control is empty, meaning that there are no restrictions on access to your instance.

Personal External IP Address

First thing I do is find my own external ip address, and use that as first to allow.

  1. Open internet browser

  2. Go to www.google.com

  3. Google what is my ip address

  4. Result is displayed

Please note that the system won't let you lock yourself out, so if you try to add a rule such that your current address would be locked out, the system warns you and refuses your insert.

Company IP Range

Ask your network admin what range of ip addresses your company uses.

Vendor IP Range

Also consider is any integrations used outside of your company. You may have to look at the Transaction Log to see what IP address the integration is using. You may have to also contact the outside vendor for this IP Address range. This isn’t always so easy if the vendor doesn’t exactly know what IP range they have.

Contractor IP Range

If you have contractors that work at home without an vpn, you’ll want to add their IP addresses or get them on the vpn.

ServiceNow Instances

Look up all the ServiceNow instances used at your organization and their IP address. To ensure that IP Address Access Control does not cause update sets to fail, add the target instance as an exception on the source instance.

Viewing IP and datacenter information HI Service Portal

  1. Navigate to hi.service-now.com.

  2. Click Service Catalog

  3. Search for Instance Management

  4. click on My IP Information

STEP 2: Allow IP Addresses

Using the IP Addresses you gathered in Step 1, add them to the ServiceNow allow ranges

Allow IP Address

  1. Login as an admin

  2. Navigate to System Security > IP Address Access Control to see a list of your IP access controls.

  3. Click New

    Type: Allow

    Range Start: 64.236.16.0 (Example)

    Range End: 64.236.16.235 (Example)

  4. Click Submit

  5. Repeat for the ranges needed.

STEP 3: Deny All

After you have entered all the allowed ip addresses, block all others not listed.

Allow rules always supersede deny rules. So if an address is both allowed (by one rule) and denied (by a second rule) it is, in fact, allowed.

Deny all

  1. Login as an admin

  2. Navigate to System Security > IP Address Access Control to see a list of your IP access controls.
    Type: Deny
    Range Start: 0.0.0.0
    Range End: 255.255.255.255

  3. Click Submit

Note that you can deactivate the Deny All entry if troubleshooting a 403 error.

STEP 4: Find denied IP Addresses

A user whose access is restricted based on an access rule gets a 403 error on their browser.

You may have missed some allowed IP addresses in step 2. Checking in the node log allows you to see any ip addresses that are receiving the 403 error.

How to check the Node Log

  1. Login as an admin

  2. Navigate to System Logs > Utilities > Node Log File Browser..

  3. Browse the logs by criteria, such as time period and message.

  4. You can also download log files when you know which log you are looking for, by navigating to System Logs > Utilities > Node Log File Download.

    Log entries for blocked IP address appear as follows:

    2015-10-21 18:37:43 (175) http-30 WARNING *** WARNING *** Security restricted: Access restricted (xx.xx.xxx.xxx not authorized)

  5. Follow the steps listed in Step 2 to add allowed ip addresses as needed.

Google Chrome Search

$
0
0

All the cool kids are using the Google Chrome search engines to quickly navigate ServiceNow.

How to add a ServiceNow Search Engine

  1. Open Google Chrome

  2. Click the ellipsis in top right corner (three dots)

  3. Click Settings

  4. Scroll down and go to Search → Manage search engines

  5. Click the Add Button

  6. Add field data. Examples are listed below

  7. Click Save

Usage

  1. After you add a search engine

  2. In the Google Search Bar → type the keyword → click tab or space → your search query

    Example: gs mike

  3. Click the Enter key

Search Engine Examples

Replace <instance> with your instance name.

Global Search

  • Search engine: ServiceNow | Text Search
    Keyword: gs
    URL: https://<instance>.service-now.com/nav_to.do?uri=textsearch.do?sysparm_search=%s

Table

  • Search engine: ServiceNow | Table | List
    Keyword: tl
    URL: https://<instance>.service-now.com/nav_to.do?uri=%s_list.do

  • Search engine: ServiceNow | Table | List | Filter Only
    Keyword: tlf
    URL: https://<instance>.service-now.com/nav_to.do?uri=%s_list.do?sysparm_filter_only=true

  • Search engine: ServiceNow | Table | List | Filter Pinned
    Keyword: tlfp
    URL: https://<instance>.service-now.com/nav_to.do?uri=%s_list.do?sysparm_filter_pinned=true

  • Search engine: ServiceNow | Table | List | Filter Pinned | Filter Only
    Keyword: tlflo
    URL: https://<instance>.service-now.com/nav_to.do?uri=%s_list.do?

    sysparm_filter_pinned=true%26sysparm_filter_only=true

  • Search engine: ServiceNow | Table | New
    Keyword: tn
    URL: https://<instance>.service-now.com/nav_to.do?uri=%s.do?sys_id=-1

  • Search engine: ServiceNow | Table | New | Caller Logged In
    Keyword: tnc
    URL: https://<instance>.service-now.com/nav_to.do?uri=%s.do?sys_id=-1%26sysparm_query=caller_id=javascript:gs.getUserID()

  • Search engine: ServiceNow | Table | Active | PDF
    Keyword: tpdf
    URL: https://<instance>.service-now.com/nav_to.do?uri=%s_list.do?sysparm_query=active=true%26PDF

  • Search engine: ServiceNow | Table | Active | CSV
    Keyword: tcsv
    URL: https://<instance>.service-now.com/nav_to.do?uri=%s_list.do?sysparm_query=active=true%26CSV

  • Search engine: ServiceNow | Table | Configuration
    Keyword: tconfig
    URL https://<instance>.service-now.com/sys_db_object_list.do?sysparm_query=name=%s

User

  • Search engine: ServiceNow | User | Search
    Keyword: us
    URL: https://<instance>.service-now.com/nav_to.do?uri=sys_user_list.do?sysparm_query=user_nameLIKE%s

  • Search engine: ServiceNow | User | My Profile
    Keyword: myprofile
    URL: https://<instance>.service-now.com/nav_to.do?uri=sys_user.do?sys_id=javascript:gs.getUserID()

Incident

  • Search engine: ServiceNow | Incident | New
    Keyword: inc
    URL: https://<instance>.service-now.com/nav_to.do?uri=incident.do?sys_id=-1

  • Search engine: ServiceNow | Incident | New | Caller Logged In
    Keyword: incc
    URL: https://<instance>.service-now.com/nav_to.do?uri=incident.do?sys_id=-1%26sysparm_query=caller_id=javascript:gs.getUserID()

  • Search engine: ServiceNow | Incident | New | Major Incident
    Keyword: incmajor
    URL: https://<instance>.service-now.com/nav_to.do?uri=incident.do?sys_id=-1%26sysparm_template=Major%20Incident

Service Portal

  • Search engine: ServiceNow | Service Portal
    Keyword: sp
    URL: https://<instance>.service-now.com/sp

Catalog Items

  • Search engine: ServiceNow | Catalog Items
    Keyword: sp
    URL: https://<instance>.service-now.com/sc_cat_item_list.do?sysparm_query=active%3Dtrue

My Work

  • Search engine: ServiceNow | My Work
    Keyword: mywork
    URL: https://<instance>.service-now.com/task_list.do?sysparm_query=active%3Dtrue%5Eassigned_to%3Djavascript%3AgetMyAssignments()%5Estate!%3D-5

Knowledge

  • Search engine: ServiceNow | Knowledge
    Keyword: knowledge
    URL: https://<instance>.service-now.com/nav_to.do?uri=%2F$knowledge.do

ServiceNow Documentation

  • Search engine: ServiceNow | Documentation | Search
    Keyword: ds
    URL: https://docs.servicenow.com/search?q=%s

CTI

  • Search engine: ServiceNow | CTI | Caller Name
    Keyword: ctic
    URL: https://<instance>.service-now.com/cti.do?sysparm_caller_name=%s

  • Search engine: ServiceNow | CTI | Caller Phone
    Keyword: ctip
    URL: https://<instance>.service-now.com/cti.do?sysparm_caller_phone=%s


Import Software Entitlements

$
0
0

The import entitlements feature from Software Asset Management allows you import a batch of entitlements from a Microsoft excel spreadsheet and view error results in a separate list or either fix or ignore.

Before ServiceNow introduced this functionality, we were building import sets and elaborate transform maps to import entitlement data. This new import feature is a welcome improvement.

Here are the steps I follow when importing software entitlements

INstructions

Import Software Installations

You can import software installations from applications like ServiceNow Discovery and Microsoft SCCM Integration.

Normalize DATA

Running the Guided Setup for Normalization Data Services also helps maintain consistency for table fields that refer to a company name. This step may be optional, but I always do this.

GATHER Entitlement data

This is often the most difficult part. Trying to gather what entitlement data you own. It can be scattered in various documents, hidden in Sharepoint directories, etc. Sometimes you do find luck and are able to find a beautiful spreadsheet containing the data needed.

Download Template File

  1. Navigate to Software Asset > Licensing > Import Entitlements

  2. Click Download Template File

Merge Entitlement Data into Template file

Take the entitlement data you gathered earlier and try to place it into the template file.

  1. The first tab of the template contains the Quick Start Guide on how to import entitlement data.

  2. All cells in an entitlement row must contain a value, including cells with a drop-down list.

  3. Each entitlement row must be unique.

  4. Don’t change the column headers. Column names must be exact. I think extra columns and mixing up the columns also causes it to fail. That might be my superstition however

  5. You’ll have to look at an entitlement in ServiceNow to decide what is the correct data for certain columns in the template

It the document is not formatted correctly, it will not import.

Import Data

  1. Navigate to Software Asset > Licensing > Import Entitlements

  2. Drag your template file into the form

  3. Click Upload

Import Software Entitlements

Import Software Entitlements

Entitlement Import Errors

An Entitlement Import Error record is created when there are errors using the Import Entitlements feature. You will likely receive some Entitlement Import Errors when importing a large file.

When an Entitlement Import Error record is updated to resolve the error, the entitlement is created and the error status is changed to Fixed. All fields are read-only when the error status changes to Fixed or Ignored.

More information on ServiceNow Docs

These are my notes on fixing these import errors

Publisher Part Number not found

  1. Click “Create Part Number”

  2. Select Product.  After you click the search button, you can also filter by publisher

  3. Click Submit

  4. Entitlement is created and Entitlement Import Error is fixed

  5. Related Entitlement Import Errors may also be automatically fixed after this if they use the same publisher part number

Product not available

  1. Left Navigator Bar > Custom Products > New

  2. Add data

  3. Click Update

Publisher Not Found

  1. Left Navigator Bar > Software Asset > Custom Software Product

  2. Add data

    • Publisher

    • Product

    • Product type: Licensable

  3. Click Update

Import template customized resulting in one or many fields being invalid

Don’t customize the import template

Purchased rights should be greater than 0

There is an issue with the import spreadsheet

Duplicate entry

Click Create Entitlement if not a duplicate

Unprocessed Accounts

$
0
0

Report on Accounts without Contacts, Assets, Contracts, or Entitlements.

Script Include

Script Include: SNEReportUtil
Client Callable: true
Accessible from: All application scopes
Script:
var SNEReportUtil = Class.create();
SNEReportUtil.prototype = Object.extendsObject(AbstractAjaxProcessor, {
	filterUnprocessedAccounts: function ()
	{
		var accounts = [];
		var grCA = new GlideRecord('customer_account');
		grCA.addEncodedQuery('customer=true');
		grCA.query();

		while(grCA.next()) {
			var contacts = getAccountCount('customer_contact', grCA.sys_id);
			var assets = getAccountCount('alm_asset', grCA.sys_id);
			var contracts = getAccountCount('ast_contract', grCA.sys_id);
			var entitlements = getAccountCount('service_entitlement', grCA.sys_id);
			if (contacts == 0 && entitlements == 0 && assets == 0) 
				
			
		}
		return accounts;

		function getAccountCount(table,sysID) {
			//Contact Count
			var ga = new GlideAggregate(table);	
			ga.addQuery('account',sysID);
			ga.addAggregate('COUNT');
			ga.query();
			if(ga.next()) {
				return ga.getAggregate('COUNT');
			}
		}
	},
	type: 'SNEReportUtil'
});

Report

Report: Unprocessed Accounts
Source Type: table
Table: Account [customer_account]
Filter: sys ID is one of javascript:new SNEReportUtil().filterUnprocessedAccounts();

ServiceNow Application List

$
0
0

List of available ServiceNow applications as of November 2019. Let me know in the comments if I missed any!

IT Service Management

  • Incident Management

  • Problem Management

  • Change Management

  • Release Management

  • Request Management

  • Procurement

  • Contract Management

  • Service Portal

  • Virtual Agent

  • Agent Chat

  • Predictive Intelligence

  • Performance Analytics

  • Walk-up Experience

  • Knowledge Management

  • Asset Management (Hardware)

  • Cost Management

  • Reports

  • Dashboards

  • Service Level Management

  • Configuration Management

  • Benchmarks

  • Surveys and Assessments

  • Continual Improvement Management

  • System Status

  • Outage Management

  • Major Incident Management

  • Now Mobile

  • Mobile Agent

  • Mobile Onboarding

  • Agent Workspace

  • Service Owner Workspace

  • Vendor Manager Workspace

  • Vendor Ticketing

  • Enterprise Onboarding and Transitions

  • Employee Service Center

  • Service Desk Call

  • Continual Improvement Management

IT Operations Management

  • ITOM Visibility

  • ITOM Health

  • ITOM Optimization

  • Discovery

  • Service Mapping

  • Event Management

  • Operational Intelligence

  • Cloud Management

  • Integration Hub / Orchestration

  • Data Certification

IT Business Management

  • Application Portfolio Management

  • Demand Management

  • Resource Management

  • Innovation Management

  • Scaled Agile Framework (SAFe)

  • Financial Planning

  • Project Portfolio Management

  • Agile Development

  • Test Management

  • Automated Test Framework

  • Financial Modeling

  • Financial Charging

  • Finance Close Automation

  • Investment Funding

Software Asset Management

  • Software Asset Management Foundation

  • Software Asset Management Premium

Security Operations

  • Security Incident Response

  • Vulnerability Response

  • Configuration Compliance

  • Threat Intelligence

  • Trusted Security Circles

  • Performance Analytics for Security Operations

Governance, Risk, and Compliance

  • Policy and Compliance Management

  • Risk Management

  • Audit Management

  • Vendor Risk Management

  • Advanced Risk

  • Use Case Accelerators

  • Performance Analytics for GRC

Customer Service Management

  • Customer Service Management

  • Agent Workspace

  • Case and Major Issue Management

  • Predictive Intelligence

  • Omni-Channel

  • Visual Workflow and Automation

  • Appointment Booking

  • Self Service

  • Virtual Agent

  • Field Service Management

  • Communities

  • Service Management for Issue Resolution

  • Proactive Customer Service Operations

  • Customer Service Management Mobile app

  • Customer Data Management

  • Visual Task Assignment

  • Self-Service

  • Surveys

  • Reports and Dashboards

  • Performance Analytics

  • Operations Management

  • Financial Modeling

  • Project Portfolio Management

HR Service Delivery

  • Case and Knowledge Management

  • Employee Service Center

  • Enterprise Onboarding and Transitions

  • Employee Document Management

  • Performance Analytics for HR Service Delivery

  • Virtual Agent

  • Predictive Intelligence

Service Management

  • Facilities Service Management

  • Finance Service Management

  • Marketing Service Management

Now Platform

  • Custom Applications

  • Automated Test Framework

  • Service Portal

  • Certified Applications

  • Integrations

  • Managed Documents

  • Anonymous Connect Support

  • CTI Softphone

  • Delegated Development

  • Team Development

  • Translations

  • Multi Provider SSO

  • IP Range Based Authentication

  • On Call Scheduling

Innovation Library

$
0
0

The Innovation Library is a tool kit for anyone building apps and portals on the Now Platform. It is comprised of reusable components and grab-and-go code, to allow you to build faster with a consistent ServiceNow look and feel. Search our expanded categories for solutions that fit your business needs.

I like the Bondi Theme and Multi-Screen catalog item widget. Planning on using them on future projects.

Agile Development 2.0

$
0
0

The ServiceNow Agile Development 2.0 application provides an agile software development environment for product-based or project-based efforts, using the Scrum framework. It offers you the flexibility to implement a pure agile approach over the entire life-cycle of a product, or a hybrid approach using agile methods within a traditional project structure.

Activate

The only plugin you need to enable to use Agile Development 2.0 is “Agile Development 2.0”. However there are other plugins available that you may be interested in below.

  • Agile Development 2.0- main application

  • Agile Development Unified Backlog (optional) - Include items such as problems, incidents, enhancement requests, and other ServiceNow tasks into your Agile workflow, and work them just as you would work stories.

  • Project Portfolio Suite (optional) - to use the project workbench

  • Demand Management (optional) - to use demands

  • Agile Development 2.0 - ATF Tests (optional) - Agile Development 2.0 - ATF Tests provides you test cases and test suites that can be run on the Agile Development 2.0 application.

  • Performance Analytics Content Pack for Agile 2.0 (optional) - Agile Dev 2.0 dashboards for Teams, Sprints, Releases, and Epics.

These plugins are related to SAFe:

  • Agile - Scaled Agile Framework - Essential SAFe - Scaled Agile Framework was designed to apply Lean-Agile principles to the entire organization. Essential SAFe is most basic configuration of the framework and it provides the minimal elements necessary to be successful with SAFe: manage your agile release train backlog, plan program increments, implement stories, and track sprints.

  • Agile - Scaled Agile Framework - Essential SAFe - ATF Tests - provides you test cases and test suites that can be run on the Agile - Scaled Agile Framework - Essential SAFe application.

  • Agile - Scaled Agile Framework - Portfolio SAFe - Use Portfolio SAFe to apply lean and agile principles to your portfolio work.

  • Agile - Scaled Agile Framework - Unified Backlog - Include items such as problems, incidents, enhancement requests, and other ServiceNow tasks into your SAFe team workflow, and work them just as you would work stories.

  • Performance Analytics Content Pack for Essential SAFe - Essential SAFe dashboards for Teams, Sprints, Program Increments, Agile Release Trains, Features, and Epics.

You will need to activate the Agile Development plugin at a minimum to use the application.

Upgrades

If you are upgrading from an earlier ServiceNow release version of Agile Development to Agile Development 2.0, read upgrade information before activating the plugin.

DATA MODEL

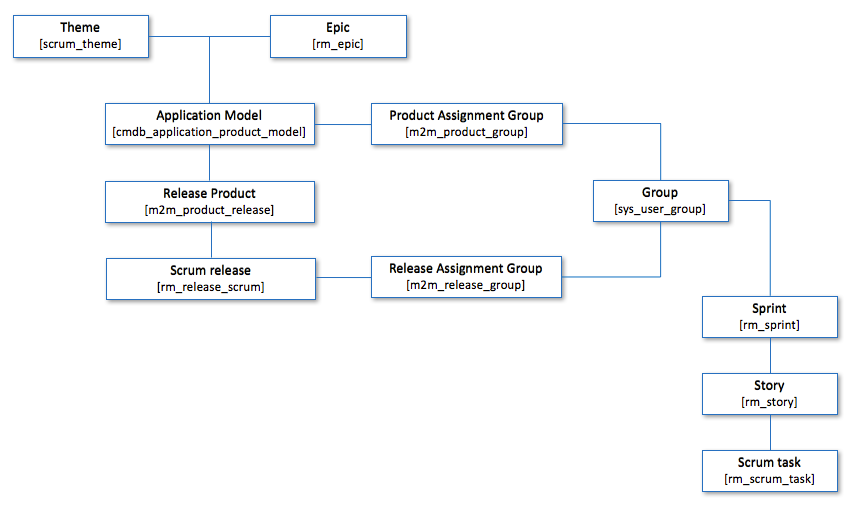
Agile Development uses these tables to manage the agile process, represent releases, and represent product backlog items to be included in a sprint.

Agile Development Relationship Diagram

Agile Development Relationship Diagram

Also note that these SDLC Tables are also available:

  • Defect [rm_defect] - Represents a deviation from the expected behavior of a product.

  • Documentation Task [rm_doc] - Represents documentation tasks for the product.

  • Enhancement [rm_enhancement] - Represents an improvement to an existing product.

  • SDLC release [rm_release_sdlc] - Represents individual versions of the product.

  • Testing Task [rm_test] - Represents testing tasks for the product.

AGILE DEVELOPMENT IN ACTION

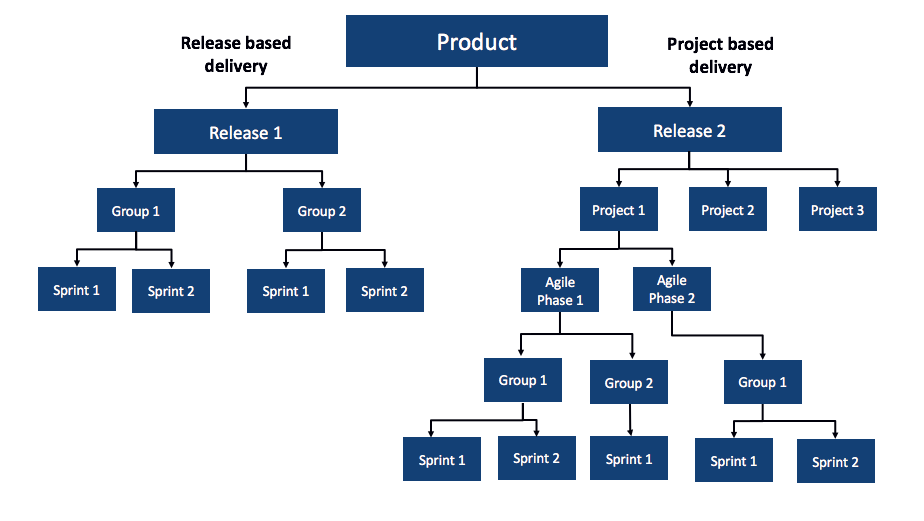
There potentially two types of development methods used within the Agile Development 2.0 application, Product-based and Project-based.

Different organizations follow different methods to deliver backlog/stories. However here are some example way you can use Agile Development

AgileDevelopmentUseCases.png

PRODUCT-BASED

  • A product can be a complete application or “thing” or a component of a larger product.

  • Led by a product owner

  • Long Term Approach

  • Occurs indefinitely during product lifespan

Task 1: Create a product

  1. A product is defined by a set of Features and functionality

  2. Stories created that identify the user, user’s goal, and reason for the goal.

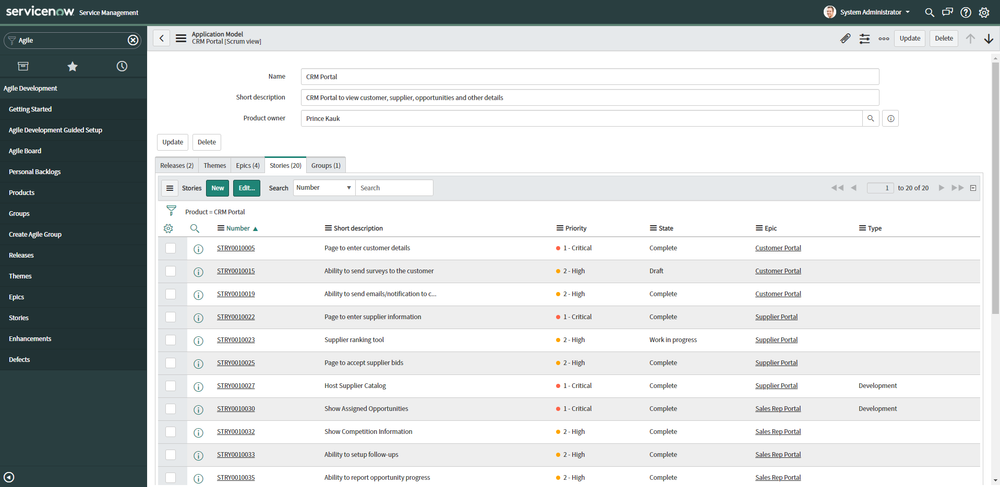
  3. Stories make up the Product Backlog

  4. Product Owner prioritizes the stories

  5. Product Owner combines the highest priority stories into a release backlog

  6. Release Backlog is organized by themes and epics

  7. Product can have a narrow focus with few user stories or a wider context with many user stories, each containing several tasks.

  8. Maintain Product Backlog – Product owners maintain the product backlog. They continuously groom their backlogs by adding stories, prioritizing and estimating them.

Agile Board

Agile Board

Product

Product

Task 2: Create an agile group

A group of type Agile Team can be created and group members can be added to it. For each group member, the default number of story points that a member completes in a sprint can be defined. At the group level, the sum of the group member story points determines the group capacity.

Task 3: Create a release AND TIMELINE

Some organizations have a fixed time frame to release stories or features, which is referred as a release. For example, a quarterly or six monthly releases. Releases are created by release or program management team and contain user stories, sometimes from multiple products that form the release backlog. A release has a start and end date during which several development iterations are completed.

Release

Release

Task 4: Create a personalized backlog (OPTIONAL)

A personalized backlog can be created by defining filter criteria. For example, one personalized backlog can be a combination of stories, defects, and incidents while the other personalized backlog can be combination of stories and incidents. In a similar manner, you can create as many personalized backlogs as necessary.

Task 5: Create a sprint

A sprint is the time frame in which development team delivers one or more stories. A sprint can be of any length, but typically takes between one and four weeks to finish. The scrum master creates one or more sprints for the group. A release can have multiple sprints in it. All sprints within a release must fit within the release start and end dates.

The assignment group is expected to complete all stories to which it is committed within a sprint. At the same time, the group should also meet the acceptance criteria as defined in the story records. The scrum master expects that the stories are fully tested and potentially releasable. Usually, the committed stories for a specific sprint should not change during the sprint. However, the Agile Development application makes changes possible if necessary. Stories should be added or removed from a sprint only after a discussion with the group, scrum master, and product owner.

Task 6: Plan the sprint

Before a sprint starts, the group and scrum master decide on what stories from the backlog they can commit to complete within a sprint. The scrum master must make sure that the effort (story points) required to complete the stories matches the capacity of the group.

Stories for a sprint can be selected based on priority. To plan the sprint-related activities, use Sprint Planning.

A velocity chart is available to help in the estimation process. The velocity chart shows historical record for a group of the number of completed points, by sprint. This view gives the scrum master an idea of the general capacity of the group over time and produces more accurate sprint planning. Velocity charts are most meaningful when sprint duration and number of group members are constant. Use the velocity chart as guidance and not as a factual representation of what the group can produce in the next sprint.

Sprint Burndown

Sprint Burndown

Task 7: Track a sprint progress

The scrum master manages the sprint team efforts, provides progress reports, and removes any impediments that the team encounters. Team members update task and story records and conduct daily stand-up meetings (scrum meetings) to communicate their progress and concerns to the scrum master.

The scrum master can track the sprint progress using Sprint Tracking.

Task 8: Track a release progress

The product owner tracks the progress of the release.

Using the Analytics tab, product owner can verify whether the assignment group is completing stories and on track to achieve the release goal.

Task 9: REPEAT FOR EACH RELEASE

Continue completing releases to no end. Except when the value to the product added no longer justifies the cost.

Project-Based (PROJECT FIRST)

Project based agile development workflow example

Project based agile development workflow example

  • Clearly defined scope and end date

  • Lead by a project manager

  • Incorporates agile based efforts into a traditional waterfall based project structure

  • Common because projects are typically funded as discrete projects

  • Requires PPM Application

TASK 1: DEMAND MANAGEMENT

Use the demand management application in ServiceNow to create and fund a project. This may use idea management to have users submit ideas, which in turn maybe become demands, which may be become projects.

TASK 2: CREATE PROJECT

Projects are created that include a mix of Stories, Sprints, and Project Tasks.

TASK 3: IMPLEMENT

Implement stories using Scrum Methods and complete project tasks using traditional workflow

Project-Based (STORIES FIRST)

  • Clearly defined scope and end date

  • Lead by a project manager

  • Incorporates agile based efforts into a traditional waterfall based project structure

  • Common because projects are typically funded as discrete projects

  • Requires PPM Application

TASK 1: COLLECT STORIES

Collect new requirements in the form of agile stories or enhancements over time. This might be from your service portal.

TASK 2: Relate Stories

Relate stories in a theme or in product backlog

TASK 2: DEMAND MANAGEMENT

Using the theme of product backlog, use the demand management application in ServiceNow to create and fund a project.

TASK 3: IMPLEMENT

Implement stories using Scrum Methods and complete project tasks using traditional workflow

Investment Funding

$
0
0

Investment Funding is a new application in the New York release of ServiceNow

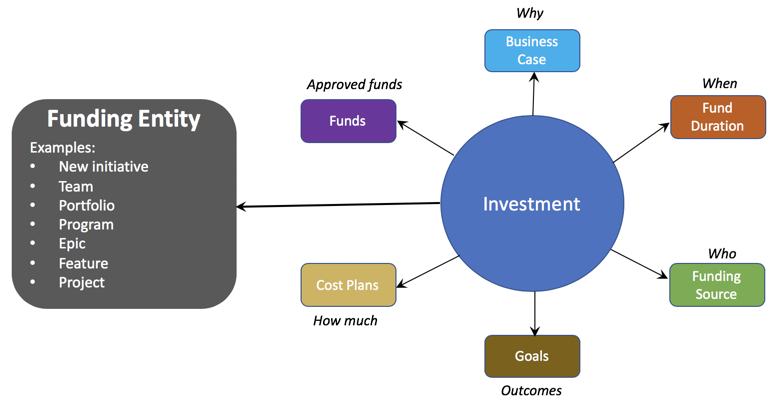
Investment Funding enables you to plan and manage investments by allocating funds to funding entities such as Business Units, Products, Teams, and the like. Prioritize your investments based on business needs and strategic objectives of your organization.

Investment Funding offers the ability to perform the following functions:

  • Create investments for funding entities.

  • Allocate funds to an investment to meet a business requirement or strategic objective.

  • Request funds from one or more funding sources to achieve business goals.

More information on Investment Funding in the ServiceNow documentation

In this article I step through the Investment funding application to learn about usage and process. Will update this article with more information as time permits.

INITIAL SETUP

STEP 1: Activate PLUGIN

The Investment Funding application requires the "Investment Funding" plugin to be activated before use.

  1. Login as admin

  2. Left Navigator Bar → System DefinitionPlugin

  3. Enter Investment Funding in the Search field.

  4. Click Activate.

STEP 2: Guided Setup

Running the Guided Setup for Investment funding eases the configuration setup.

2a. Guided Setup

  1. Login as admin

  2. Left Navigator Bar → Investment Funding → Guided Setup

  3. Click Get Started

  4. Click first task

  5. Click Configure to setup each task

  6. Mark Complete when done

  7. Guided Setup is 100% when completed

Guided Setup options are as below

2b. FiSCAL CALENDAR

Note that when you click “Configure” on this in the Guided Setup (New York) it takes you to the wrong screen.

To Generate a Fiscal Calendar

  1. Left Navigator Bar → Fiscal Calendar → Generate

  2. Select Calendar Type

  3. Click Generate Calendar

Fiscal calendar is used with funding cycles based on your business requirements. Select from one of the following fiscal calendar types:

  • Standard

  • 13 periods

  • 4-4-5 week periods

  • 4-5-4 week periods

  • 5-4-4 week periods

Once you start using the fiscal periods for funding investments, you cannot change to another fiscal calendar type.

Fiscal Calendar Generation

Fiscal Calendar Generation

2c. Funding Entities (STEP 1)

Funding entities are the transaction tables that are enabled for funding. You can receive or allocate funds through them. For example, you can create funding entities for Business Units, Epics, Portfolios, etc.

If you see label in a table name, you don’t have Project Portfolio Suite installed. This is only an issue if you want to use Investment Funding with PPS.

You likely will not need to change anything for this step, unless you have customized something and want to change a owner field or add a different funding entity.

investment-object (1).png

2d. Funding Entities (STEP 2)

Step 2 is really just if you want to nest the investment_user, investment_planner, investment_user role into another role, like business_planner or a pps role.

2e. User Roles

Roles control access to features and capabilities in applications and modules. Grant roles to your users that give them access to the functionality they need to perform their jobs.

When you click Configure on this step, it takes you the Roles page. More likely you will want to go to a group an add the intended investment role to that group. Applying roles to a group gives access to all the members of the group.

2f. Preferences

Preferences determine the behavior of the application. Set them up as per your business requirements.

You can edit two preferences here:

  • Funding frequency (Defaults to Quarter)

  • Number of editable past periods (Defaults to 1)

The defaults are good here, but I could see you setting the funding frequency to Year

2g. Business Case Definition

A business case helps you to evaluate and analyze an investment and take an informed decision.

Here you are going to adjust the choice values, fields, and form layout of the Business Case form.

Planning

STEP 1: Create a top-level investment

Create a top-level investment for a target so that you can receive and allocate funds.

  1. Login as a user with the investment_planner role

  2. Navigate to Investment Funding > Top level Investments.

  3. Click New.

  4. On the form, fill in the fields.
    Detailed explanation of fields here: Create a top-level investment

  5. Click Submit

STEP 2: Add Funds to the investment

Loading Error

Note: If you get the issue here with loading screen spinning and browser console errors

  • Install plugin: Investment funding for PPM

  • Most companies using Investment Funding would use PPM too, but if not ServiceNow would address this in a later update.

Add Funds

  1. Login as a user with the investment_planner role

  2. Navigate to Investment Funding > Top level Investments.

  3. Open an investment to which you want to allocate funds.

  4. On the Details tab, click Add fund.

  5. On the form, fill in the fields.
    Field | Description
    Fiscal period | Fiscal period for which the fund is allocated to the investment.
    Funded capex | Amount funded as a capital expense.
    Funded opex | Amount funded as an operating expense.

  6. Click Submit

Top Level Investment

Top Level Investment

STEP 3: Create an Investment

Here I gave the role investment_user and investment_planner to Abel Tuter and Impersonated that account to demo this application

Create an investment to fund a target. Optional, used when using bottom up investment.

  1. Login as a user with the investment_user role

  2. Navigate to Investment Funding > My Investments.

  3. Click New.

  4. On the form, fill in the fields.
    Detailed explanation of fields here: Create an investment

  5. Click Submit

General Usage

Step 1: Add a business case

Add a business case for an investment to define its business needs and goals.

  1. Login as a user with the investment_user role

  2. Navigate to Investment Funding > My investments

  3. In the Investments owned by me tab, open an investment to add the business case.

  4. On the Details tab, click the Create Business case related link.The related link is available only if a business case does not exist for the investment.

  5. In the Add Business case dialog box, provide information in the fields based on your business needs and goals for the investment.

  6. On the form, fill in the fields.

    Detailed explanation of fields here: Add Business Case

  7. Click Submit

Step 2: Request funds for an investment

  1. Login as a user with the investment_user role

  2. Navigate to Investment Funding > My Investments.

  3. In the Investments owned by me tab, open an investment for which you need funds.

  4. Click the Request Funds tab.

  5. Select a working period and click Apply.The Request Funds list shows funding sources if you have previously requested funds from them for your investment.

  6. Click the Request from New Source link to select the funding source.

    Detailed explanation of fields here: Request funds for an investment

  7. In the Request Funds list, specify the amount under the Requested CapEx and Requested OpEx columns of the funding sources from which you want to request funds.The state of all updated funding sources changes to Draft, which is indicated by highlighted cells.

  8. Click Request.

  9. In the Confirm request dialog box, verify your requests and click Request.

Step 4: Add Funds

If demoing, I used Claire Ingress (CIO) to allocate funds

  1. Login as a user with the investment_user role

  2. Navigate to Investment Funding > My Investments.

  3. In the Investments owned by me tab

  4. Click the Allocate Funds tab.

  5. Click Notifications

  6. Click Add

Step 5: Allocate funds to an investment

  1. Login as a user with the investment_user role

  2. Navigate to Investment Funding > My Investments.

  3. In the Investments owned by me tab, open an investment having sufficient funds to allocate to another investment.

  4. Click the Allocate Funds tab.

  5. Select a working period and click Apply.If you have allocated funds earlier, those investments are listed in the Allocate Funds list.

  6. To add more investments to the Allocate Funds list for allocating funds, add either a new investment or existing investments, or pull a fund request.

    • To add a new investment, click the Create new link, fill in the fields, and then click the submit icon ().

    • To add existing investments, click the Add existing link, select one or more investments from the list, and then click Add Selected.Note: To include all the listed investments, click Add All.

    • To add an incoming fund request you want to fund, click the show notifications icon () and click Add next to a request in the list.

  7. In the Allocate Funds list, enter the amount under the Funded CapEx and Funded OpEx columns for all investments to which you want to allocate funds.The state of all updated investments changes to Planning, which is indicated by highlighted cells.

  8. Click Fund.

  9. In the Confirm funding dialog box, verify your allocations and click Fund.

Result

  • Funds are allocated to selected investments for the specified period.

  • The state of funded investments changes to Funded.

Step 6: Enter actual spends for an investment

  1. Login as a user with the investment_user role

  2. Navigate to Investment Funding > My Investments.

  3. In the Investments owned by me tab, open an investment for which you want to enter actuals.

  4. Click the Request Funds tab.

  5. Select a working period and click Apply.

  6. In the Request Funds list, specify the actual amount spent under the Actual CapEx and Actual OpEx columns for your investments.Note: If you do not see the Actual CapEx and Actual OpEx columns in the list, click the configuration icon and select them.

Result

  • The entered amount is updated as actual funds spent through the investment.

  • The amount rolls-up to its parent investment, which in turn rolls-up until the top-level investment.

Step 7: Put a fund request on hold

  1. Login as a user with the investment_user role

  2. Navigate to Investment Funding > My Investments.

  3. In the Investments owned by me tab, open an investment.

  4. Click the Allocate Funds tab.

  5. Select a working period and click Apply.

  6. Click the show notifications icon.

  7. In the Notifications pane, click the arrow icon next to the Add button and then select the On hold option.The state of the request changes to On hold.

Step 8: Track utilization of your funds

  1. Login as a user with the investment_user role

  2. Navigate to Investment Funding > My Investments.

  3. On the Investments owned by me tab, open an investment to review fund allocations.

  4. On the Allocate Funds tab, click the tree view icon ().Your investment and the investments that you funded directly display as cards in a hierarchical view.

  5. Click on an investment to view its fund allocation to other investments.

Deconstructing the Agile Board

$
0
0

In case you decide you want to adjust the Agile Board in Agile Development 2.0. Here is the code that exists behind it.

Backend Code

  • Script Includes: any Script include that starts with AgileB

    https://<instance>.service-now.com/sys_script_include_list.do?sysparm_query=nameSTARTSWITHAgileB Header

  • UI Macro: agile_board_header

  • UI Macro: html_page_agile_board

  • AgileBoardColumnsAndFieldsService

    https://<instance>.service-now.com/nav_to.do?uri=sys_script_include.do?sys_id=588df5f75bd2030036c32c1cf0f91a5e

Analytics Tab (Disabled in ORLANDO)

  • Dashboard: Product Owner Dashboard

    https://<instance>.service-now.com/nav_to.do?uri=%2F$pa_dashboard.do%3Fsysparm_dashboard%3D4d772cf39300030064f572edb67ffb12

Release Burndown

  • UI Page: sdlc_release_burndown_frame

    https://<instance>.service-now.com/nav_to.do?uri=sys_ui_page.do?sys_id=c1e597f0c333210028d7d56bc3d3aeca

  • Sprint Burndown UI Page: sdlc_sprint_burndown_frame

    https://<instance>.service-now.com/nav_to.do?uri=sys_ui_page.do?sys_id=f47187b0c333210028d7d56bc3d3aec9

Backlog Tab

  • UI Macro: backlog

  • For the settings menu: UI Macro: backlog_config

Sprint Planning Tab

  • UI Macro: sprint_planning

    https://<instance>.service-now.com/nav_to.do?uri=sys_ui_macro.do?sys_id=c3cc2c8253723200d044ddeeff7b12e7

  • For the settings menu: UI Macro: sprint_planning_config

    https://<instance>.service-now.com/nav_to.do?uri=sys_ui_macro.do?sys_id=0ae7040853d40300d044ddeeff7b12da

Sprint Tracking Tab

  • UI macro: sprint_board https://<instance>.service-now.com/nav_to.do?uri=sys_ui_macro.do?sys_id=4165c62453233200d044ddeeff7b12fd

    Stored in vtb_board table

Task Progress Board

  • sorted by created date, latest to newest

  • Code located in UI Macro: task_planning_board, and other places

Find Code

  • Click Hamburger > Dashboard Properties

  • Used findrecordby Sysid to find the record

  • Used code search in studio to search more


GlideRecord Scripting

$
0
0

The most common and fundamental scripting used in ServiceNow is GlideRecord. Alter and reuse these scripts found in this post for your ServiceNow implementation.

Important Note: Always run GlideRecord statements in a development instance first and make sure they work correctly before using in production!

Server Side

Query

WHILE LOOP

This will return multiple records, because a while statement is used to cycle through the query results.

(function() {
grCI = new GlideRecord('cmdb_ci');
grCI.addQuery('sys_class_name','=','cmdb_ci_rack');
grCI.query();
while (grCI.next()){
gs.log('CI Found: '+grCI.name);
}
})();

IF STATEMENT

This will return one record, because a if statement is used to cycle through the query results. This is good if you just want to find one record, however the query would have returned seven items, which isn't completely efficent.

(function() {
var grIncident = new GlideRecord('incident');
grIncident.addQuery('priority','5');
grIncident.addQuery('category','inquiry');
grIncident.query();
if (grIncident.next()) {
gs.log('Incident Found: '+grIncident.number);
}
})();

SET LIMIT

The setLimit statement helps performance, because only one record is returned with the query.

(function() {
var grIncident = new GlideRecord('incident');
grIncident.addQuery('priority','5');
grIncident.addQuery('category','inquiry');
grIncident.setLimit(1);
grIncident.query();
if (grIncident.next()) {
gs.log('Incident Found: '+grIncident.number);
}
})();

ENCODED QUERY

Using an encoded query is often easier than multiple addQuery lines. You can also use Copy Query to help figure out your encoded query content which is helpful.

(function() {
var grIncident = new GlideRecord('incident');
grIncident.addEncodedQuery('priority=5^category=inquiry');
grIncident.query();
while (grIncident.next()) {
gs.log('Incident Found: '+grIncident.number);
}
})();

GET

it will return one record, because a get statement is used.

(function() {
    var grIncident = new GlideRecord('incident');
    grIncident.get('57af7aec73d423002728660c4cf6a71c');
    gs.log('Incident Found: '+grIncident.number);
})();

OR QUERY

Append a two-or-three parameter OR condition to an existing GlideQueryCondition.

I prefer to use an encoded query instead of this, but there are situations where this is easier.

(function() {
var grIncident = new GlideRecord('incident');
var qc = grIncident.addQuery('category', 'hardware');
qc.addOrCondition('category', 'network');
grIncident.query();
while (grIncident.next()){
gs.log('Incident Found: '+grIncident.number);
}
})();

INSERT

(function() {
var grIncident = new GlideRecord('incident');
grIncident.initialize();
grIncident.short_description = 'www.servicenowelite.com';
grIncident.category = 'network';
grIncident.subcategory = 'dns';	
grIncident.contact_type = 'email';
grIncident.caller_id.setDisplayValue('Fred Luddy');
grIncident.insert();
gs.log('Incident created: '+grIncident.number);
})();

UPDATE

UPDATE

If you are doing an update statement in your script, it is good to be extra careful.  Comment out your update statement and add a log statement to check the script for accuracy before actually using it.

(function() {
grCI = new GlideRecord('cmdb_ci');
grCI.addQuery('name','=','SAP WEB03');
grCI.query();
gs.log('grCI Query: ' + grCI.getEncodedQuery() + ' = ' + grCI.getRowCount());
while (grCI.next()){
grCI.comments='ServiceNowELITE.com';
//grCI.update;
}
})();

setWorkflow(false) and autoSysFields(false)

When you are mass updating records, sometimes you don't want to run the business rules/workflow on every record you updated or have your name and the last updated time be when you updated it.  Here is an example on how to avoid this:

(function() {
grCI = new GlideRecord('cmdb_ci');
grCI.addQuery('name','=','SAP WEB03');
grCI.query();
gs.log('grCI Query: ' + grCI.getEncodedQuery() + ' = ' + grCI.getRowCount());
if (grCI.next()){
grCI.comments='ServiceNowElite.com';
grCI.setWorkflow(false); //Do not run business rules
grCI.autoSysFields(false); //Do not update system fields
//grCI.update;
}
})();

DELETE

If you are doing an delete statement in your script, it is good to be extra careful.  Comment out your delete statement and add a log statement to check the script for accuracy before actually using it.

(function() {
var grComputer = new GlideRecord("cmdb_ci_computer");
grComputer.addEncodedQuery('sys_created_by=mikekaufman')
grComputer.query();
gs.log('grComputer Query: ' + grComputer.getEncodedQuery() + ' = ' + grComputer.getRowCount());
var deleteCount = 0;
while(grComputer.next()){
grComputer.setWorkflow(false);
//grComputer.deleteRecord();
deleteCount++;
}
gs.log('Records Deleted: '+ deleteCount);
})();

Client Side

You can use similar GildeRecord scripts on the client side, except you should enclose them in a GlideAjax Query

In the example below, it uses a Script Include and Client Script to set the Department field on a form based on the Requested For user.

Script Include

Name: SNEClientUtil
Client Callable: True
Scope: All application scopes
Script:
var SNEClientUtil = Class.create();
SNEClientUtil.prototype = Object.extendsObject(AbstractAjaxProcessor, {
	getUserInfo : function() {
		var usr = this.getParameter('sysparm_user');
		var obj = {};
		var gr = new GlideRecord('sys_user');
		gr.addQuery('sys_id', usr);
		gr.query();
		if(gr.next()) {
			obj.phone = gr.phone.toString();
			obj.email = gr.email.toString();
			obj.mobile_phone = gr.mobile_phone.toString();
			obj.department = gr.department.sys_id.toString();
			obj.manager = gr.manager.sys_id.toString();
			obj.location = gr.location.sys_id.toString();
		}
		var json = new JSON();
		var data = json.encode(obj);
		return data;
	},
	type: 'SNEClientUtil'
});

Client Script (ON LOAD)

Name: Set User Info
Applies to: A Catalog Item
Type: onLoad
UI Type: All
Applies on a Catalog Item view: true
Script:
function onLoad() {
	var ga = new GlideAjax('global.SNEClientUtil');
	ga.addParam('sysparm_name', 'getUserInfo');
	ga.addParam('sysparm_user', g_form.getValue('requested_for'));
	ga.getXML(processAnswer);
}
function processAnswer (response)  {
	var answer = response.responseXML.documentElement.getAttribute("answer");
	var obj = JSON.parse(answer);
	g_form.setValue('department', obj.department);
}

CLIENT SCRIPT (ON CHANGE)

Name: Set User Info
Applies to: A Catalog Item
Type: onChange
Variable Name: requested_for
UI Type: All
Applies on a Catalog Item view: true
Script:
function onChange(control, oldValue, newValue, isLoading) {
	if (isLoading) {
      return;
   }
		
	
	if (newValue == '') {
		g_form.setValue('department', '');
	}
	var ga = new GlideAjax('global.SNEClientUtil');
	ga.addParam('sysparm_name', 'getUserInfo');
	ga.addParam('sysparm_user', g_form.getValue('requested_for'));
	ga.getXML(processAnswer);
}
function processAnswer (response)  {
	var answer = response.responseXML.documentElement.getAttribute("answer");
	var obj = JSON.parse(answer);
	g_form.setValue('department', obj.department);
}

Custom URL

$
0
0

You can configure one or multiple custom URLs to your instance, and configure your custom URL to Service Portal mapping.

Custom URLs are not available for on-premise customers or developer instances. Also, the URL must be public-facing.

More information in the ServiceNow Documentation

Step 1: Obtain Domain

Before you can associate a custom URL, you must own (or purchase) a URL through a domain provider. There are also specific configurations necessary before you can create and associate a custom URL on your instance.

  • Set the CNAME with the provider - The CNAME record must be set as the ServiceNow instance URL.

  • Determine your dedicated VIP status - Your ServiceNow instance must be on a dedicated VIP. Contact ServiceNow HI support for any issues.

Step 2: Activate Plugin

  1. Login as an admin

  2. Navigate to System Definition > Plugins.

  3. Find and click the Custom URL plugin.Note: Do not select the Custom URL - Internal plugin, which is an internal component for scripted custom URL APIs.

  4. On the Custom URL record, click the Activate/Repair related link.

  5. In the Plugin Activation window, click Activate

Step 3: Activate Property

  1. Login as an admin

  2. In the left navigator bar, type sys_properties.list

  3. Search for glide.customurl.enabled

  4. Open glide.customurl.enabled record

  5. Set the value to true

  6. Click Update

Step 4: Set Custom URL

Add a custom URL to your instance configuration to use instead of your ServiceNow-designated URL.

  1. Login as an admin

  2. Navigate to Custom URL > Customer URLs.

  3. Click New

  4. Fill in the appropriate fields:

    Domain Name - Fully qualified domain name (FQDN) of the custom URL.Note: For example, servicenow.acme.com is the FQDN of the https://servicenow.acme.com URL.

    Is Instance URL - Check box to enable this custom URL for all outbound URLs. Only one active custom URL can be the instance URL.

    To enable this setting for a custom URL, click 

    Set as Instance URL - on the URL record. Any previous custom URLs are then removed.

    Status - Status of the custom URL record. If the status is Active, the custom URL is provisioned and ready to use.

    Service Portal - Choose the service portal to redirect users when they access your instance using the custom URL.

  5. Click Submit

StEp 5: Check for errors

A custom URL should activate within six hours. Polling for custom URL job completion occurs every 30 minutes.

If your custom URL doesn’t work, refer to the ServiceNow documentation for Error Fixes

Access Controls

$
0
0

If you are looking at this article, you probably are wondering how to fix an access control (ACLs) issue. I hope to help you on this journey!

What is an Access Control (ACL)?

An instance uses access control list (ACL) rules, also called access control rules, to control what data users can access and how they can access it. ACL rules require users to pass a set of requirements in order to gain access to particular data. Each ACL rule specifies:

  • The object and operation being secured

  • The permissions required to access the object

An ACL can effect data security:

  • A field visible/not visable

  • A field is readonly/not readonly

  • A record can be deleted/not deleted

  • A user can/can’t create a record

  • Etc

How to edit ACLs

You have to elevate your role to security_admin to edit Access controls

How to elevate your role

  1. Make sure you have the security_admin role. If you don’t have it, someone else with the role will have to grant it to you.

  2. In the User Menu > Click Elevate Roles

  3. In the elevate roles dialog, select security_admin and then click the OK button

Aspects of the Access Control Form

Access Control Form

Access Control Form

Field Description
Type ACLs can run on Client Callable Script Includes, processor, record, REST_endpoints, and ui pages.  
99% of the time you are creating "record" ACLs.  Sometimes REST_endpoints. I haven't used the other types, but might someday.
Application Application containing the ACL.  The scoped application that created this ACL
Operation The type of operation on the data.  Most common options used: create, read, write, delete, and list_edit.
Active If the ACL is active or not.  This field is helpful if you are debugging ACLs.  You can turn ACLs off until you find the one with the issue.
Admin overrides Users with the admin role can override this rule. Personally I think this should always be checked, as an admin should be able to do everything.
However there are times when you want to to protect the admin from causing unwanton destruction.
Advanced Select this check box to display the Script field on the form
Protection policy Controls how application files are protected when downloaded or installed.
Aggravates developers by making things readonly, and you have to hack the system to get around this roadblock
Name Enter the name of the object being secured, either the record name or the table and field names. The more specific the name, the more specific the ACL rule. You can use the wildcard character asterisk (*) in place of a record, table, or field name to select all objects that match a record type, all tables, or all fields. You cannot combine a wildcard character and a text search. For example, inc* is not a valid ACL rule name, but incident.* and *.number are valid ACL rule names.
Description description of the object or permissions this ACL rule secures.
Requires role Use this list to specify the roles a user must have to access the object. If you list multiple roles, a user with any one of the listed roles can access the object. The Requires role list appears as a related list.
Condition Use this condition builder to select the fields and values that must be true for users to access the object.
Script Enter a custom script describing the permissions required to access the object. The script can use the values of the current and previous global variables as well as system properties. The script must generate a true or false response in one of two ways: return an answer variable set to a value of true or false evaluate to true or false In either case, users only gain access to the object when the script evaluates to true and the user meets any conditions the ACL rule has. Both the conditions and the script must evaluate to true for a user to access the object.

Example TABLE-LEVEL ACLs

Table Level ACL with None

Incident Delete ACL

Incident Delete ACL

  • Delete ACL on the incident table level

  • Admin Overrides is true and Requires role of itil_admin

  • If the user has the admin or itil_admin role, they get delete access to the incident table

Table Level ACL with * wildcard

Incident Read ACL

Incident Read ACL

  • Read acl applies to all the fields on the incident table

  • Makes all the fields are viewable on the incident table

  • There are other acls in ServiceNow that block read access to individual ServiceNow fields

TaBLE Level ACL with Script

ACL_Table_Script.PNG
  • Table-level ACL for read access on the incident table

  • Admin Overrides is true

  • There is a script in the ACL that allows the opened by, caller, or users on the watchlist read access to the incident table.

  • If a user is an admin, opened by, caller or user on the watchlist on the incident, they get read access.

Example Field Level ACLs

Field Level ACL with Required Role

ACL_Field_Role.PNG
  • Field-level ACL for write access on the Incident table for the Caller field.

  • Admin overrides is true

  • It requires the itil or sn_incident_write role

  • If a user has the admin, itil, or sn_incident_write role, they receive write access to the Caller field

Field Level ACL with Condition

ACL_Field_Condition.PNG
  • Field-level ACL for write access on the Incident table for the Resolution code field.

  • Admin overrides is true

  • It has a condition that incident state is not closed

  • If the incident state is not closed, they receive write access to the Resolution code field

Access Control processing

We just look at individual ACLs and how they work. However it is many individual ACLs working together to form the data security for ServiceNow. They also process within themselves in an order (Roles > Condition > Script).

Here is a good chart that shows the ACL process

AclEvaluatePermissions.png

Debugging

If you found this article, you likely are trying to fix a readonly issue.

This is my process for debugging ACLs:

  1. Table or Field. Is this a table-level or field-level issue? Look at related ACLs for issues

  2. Parent Table. Look at parent table ACLs if applicable

  3. Active Flag. Flip the active flag to false on ACLs to find conflicting ACLs. If found, fix the ACL. Remember to flip the active back to true when completed.

  4. Add ACL. Add new ACLs as needed. Sometimes you deactivate an ACL, but that isn’t that often. Don’t delete ACLs, that causes issues later for the most part.

  5. Browser Console. View the Browser Console for errors

  6. Debug Tool. Run the Access Control Debug and other debug tools ServiceNow has.

  7. Other Code. There is other code in ServiceNow that affects security. Look in those areas as well

    • Client Script

    • UI Policy

    • Data Policy

    • Business Rules

    • Dictionary

    • Script Includes

  8. Ask for Help. Community > Consultant > HI Support. I try not to bother HI Support much on ACL issues, but sometimes you do get truly stumped

Here is a helpful table of ACL failure reasons. I highlighted the most common operations.

Operation Results of failing an ACL rule on object
execute User cannot execute scripts on a record or UI page.
create User cannot see the New UI action from forms. The user also cannot insert records into a table using API protocols such as web services.
A create ACL with a condition requiring that a field contain a specific value always evaluates as false. Fields on new records are considered empty until the record is saved.
read User cannot see the object in forms or lists. The user also cannot retrieve records using API protocols such as web services.
write User sees a read-only field in forms and lists, and the user cannot update records using API protocols such as web services.
delete User cannot see the Delete UI action from forms. The user also cannot remove records from a table using API protocols such as web services.
edit_task_relations User cannot define relationships between task tables.
edit_ci_relations User cannot define relationships between Configuration Item [cmdb_ci] tables.
save_as_template Used to control the fields that should be saved when a template is created.
add_to_list User cannot view or personalize specific columns in the list mechanic.
list_edit User cannot update records (rows) from a list.
report_on User cannot create a report on the ACL table. For more information, see Restrict report creation with an ACL rule.
report_view User cannot view the content of a report on the ACL table or on the ACL field. For more information, see Restrict report creation with an ACL rule.
personalize_choices User cannot right-click a choice list field and select Configure Choices.

Your thoughts

If made any mistakes in this article, missed something, or have your own way to debug ACLs let me know in the comments below!

Syntax editor macros

$
0
0

Script macros provide shortcuts for typing commonly used code. To insert macro text into a script field, enter the macro keyword followed by the Tab.

Here is a collection of script macros I am currently using. Let us know in the comments if you have a macro to add to the list!

Name: aclscript
Application: Global
Comments: ACL Script
Text:

(function() {
	answer = false;
	if (condition) {
		answer = true;
	}
})();

Name: csajax
Application: Global
Comments: Client Side Ajax Example
Text:

function onLoad() {
	var ga = new GlideAjax('global.SNEClientUtil');
	ga.addParam('sysparm_name', 'getUserInfo');
	ga.addParam('sysparm_user', g_form.getValue('requested_for'));
	ga.getXML(processAnswer);
}
function processAnswer (response)  {
	var answer = response.responseXML.documentElement.getAttribute("answer");
	var obj = JSON.parse(answer);
	g_form.setValue('department', obj.department);
}

Name: csajaxsi
Application: Global
Comments: Script Include for Client Side Ajax Example
Text:

var SNEClientUtil = Class.create();
SNEClientUtil.prototype = 
	Object.extendsObject(AbstractAjaxProcessor, {
	getData: function() {
		var usr = this.getParameter('sysparm_user');
		var obj = {};
		var gr = new GlideRecord('sys_user');
		gr.addQuery('sys_id', usr);
		gr.query();
		if(gr.next()) {
			obj.phone = gr.phone.toString();
		}
		var json = new JSON();
		var data = json.encode(obj);
		return data;
	},
	type: 'SNEClientUtil'
});

Name: csalert
Application: Global
Comments: Client Side Alert
Text:

function onChange(control, oldValue, newValue, isLoading) {
 if (isLoading || newValue == '') {
return;
 }
 if (newValue == 'mike_awesome') {
alert('Yes this is true');
 }
}

Name: doc
Application: Global
Comments: Documentation Header
Text:

/**
 * Description: $0
 * Parameters: 
 * Returns:
*/

Name: findsysid
Application: Global
Comments: Find Record by Sys ID
Text:

(function() {
    var sysID = '4430191ddb8ce7c0d893f8621f9619d9';  //Replace with SysID
    var grObject = new GlideRecord('sys_db_object');
    grObject.addEncodedQuery('nameNOT LIKEts_^sys_update_nameISNOTEMPTY^nameISNOTEMPTY');
    grObject.addEncodedQuery('nameNOT LIKEnp$');
    grObject.query();
    while (grObject.next()) {
        var tableName = grObject.getValue('name');
        grTable = new GlideRecord(tableName);
        grTable.addQuery('sys_id',sysID);
        grTable.query();
        if (grTable.next()) {
            gs.print(gs.getProperty('glide.servlet.uri') + tableName + '.do?sys_id=' + sysID);
        }
    }
})();

Name: findtasktypes
Application: Global
Comments: Find Task Types Used
Text:

findTaskTypesUsed();
function findTaskTypesUsed() {
var count = new GlideAggregate('task');
count.addAggregate('COUNT', 'sys_class_name');
count.query();
while (count.next()) {
var taskType = count.sys_class_name;
var taskTypeCount = count.getAggregate('COUNT', 'sys_class_name');
gs.log("The are currently " + taskTypeCount + " tasks with a task type of " + taskType);
}
}

Name: findunique
Application: Global
Comments: Find Unique Values
Text:

findUnique('cmdb_ci_computer','os');//put the table and field you want to find unique
function findUnique(table,field) {
  var au = new ArrayUtil();
  var uniqueArray = [];
  var gr = new GlideRecord(table);
  gr.orderBy(field);
  gr.addNotNullQuery(field);
  gr.query();
  while (gr.next()) {
    uniqueArray.push(gr[field].toString());
  }
  gs.print('Unique Values: ' +au.unique(uniqueArray));
  //return au.unique(uniqueArray);
}

Name: for
Application: Global
Comments: For Array Loop
Text:

for (var i=0; i< myArray.length; i++) {
 //myArray[i];
}

Name: grdelete
Application: Global
Comments: Deletes a single record.
Text:

var gr = new GlideRecord("$0");
gr.addQuery('query');
gr.query();
if (gr.next()){
gr.deleteRecord();
}

Name: grencodedquery
Application: Global
Comments: Adds an encoded query to other queries that may have been set.
Text:

var gr = new GlideRecord("$0");
gr.addEncodedQuery(queryString);
gr.query();
if (gr.next()) {
   
}

Name: grget
Application: Global
Comments: Returns the specified record in an instantiated GlideRecord object.
Text:

var gr = new GlideRecord("$0");
gr.get($1);

Name: grgetdisplay
Application: Global
Comments: Retrieves the display value for the current record.
Text:

var gr = new GlideRecord("$0");
gr.get($1);
gs.info(gr.getDisplayValue());

Name: grinsert
Application: Global
Comments: Inserts a new record using the field values that have been set for the current record.
Text:

var gr = new GlideRecord("$0");
gr.initialize();
gr.setValue("field","value"); //set field values
gr.insert();

Name: grlog
Application: Global
Comments: Adds a log statement for debugging a gliderecord query
Text:

var gr = new GlideRecord("$0");
gr.addQuery("name", "value");
gr.query();
gs.log('Function| gr Query: ' + gr.getEncodedQuery() + ' = ' + gr.getRowCount());
if (gr.next()) {
   
}

Name: grorquery
Application: Global
Comments: Example GlideRecord Or Query
Text:

var gr = new GlideRecord('$0');
var qc = gr.addQuery('field', 'value1');
qc.addOrCondition('field', 'value2');
gr.query();
while (gr.next()) {

}

Name: grquery
Application: Global
Comments: Example GlideRecord Query
Text:

var gr = new GlideRecord("$0");
gr.addQuery("name", "value");
gr.query();
if (gr.next()) {
   
}

Name: grupdate
Application: Global
Comments: Updates the GlideRecord with any changes that have been made. If the record does not exist, it is inserted.
Text:

var gr = new GlideRecord("$0");
gr.addQuery('name','=','');
gr.query();
if (gr.next()){
gr.setValue("field","value"); //set field values
gr.update();
}

Name: grupdatenoworkflow
Application: Global
Comments: Enables or disables the update to the fields sys_updated_by, sys_updated_on, sys_mod_count, sys_created_by, and sys_created_on. This is often used for manually updating field values on a record while leaving historical information unchanged.
Text:

var gr = new GlideRecord("$0");
gr.addQuery('name','=','');
gr.query();
if (gr.next()){
gr.autoSysFields(false);  // Do not update sys_updated_by, sys_updated_on, sys_mod_count, sys_created_by, and sys_created_on
gr.setWorkflow(false);    // Do not run any other business rules
gr.setValue("field","value"); //set field values
gr.update();
}

Name: if
Application: Global
Comments: If statement
Text:

if (condition) {
	//block of code to be executed if the condition is true
} else { 
	//block of code to be executed if the condition is false
}

Name: messageerror
Application: Global
Comments: Error Message
Text:

gs.addErrorMessage(gs.getMessage("$0"));

Name: messageinfo
Application: Global
Comments: Info Message
Text:

gs.addInfoMessage(gs.getMessage("$0"));

Name: switch
Application: Global
Comments: switch
Text:

switch(expression) {
	case 0:
		//Case 0 code block
		break;
	case 1:
		//Case 1 code block
		break;
	default:
		//Other cases code block
}

Name: try
Application: Global
Comments: Try
Text:

try {
	//block of code to try
}
catch(err) {
	//block of code to handle errors
	//e.g. gs.log(err);
} 
finally {
	//block of code to be executed regardless of the try / catch result
}

Name: while
Application: Global
Comments: While loop
Text:

while (condition) {
	//code block to be executed
}

Webinar: Exploring CSS and the Service Portal

Viewing all 191 articles
Browse latest View live